Sunday, May 30, 2010

S-s-s-Sunday Showcase!!!

This showcase is a twofer, and it's near and dear to me because these people are doing what I'd like to be doing with my life. They're both pattern designers but they design different things. They're both sincerely talented gals and you all should go buy things from them, if not patterns, then one of the things they've crafted.

I'm promoting these in the order in which I received the patterns they graciously let me test for free. First up is CarmenBee. I found her blog through Ravelry. She had been a featured designer for a really cute shrug she designed. (It's currently a work in progress).

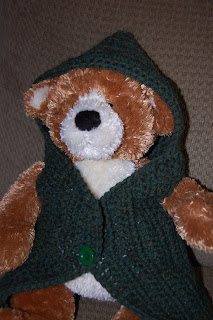
She let me test the pattern for her Baby Hoodie. You can purchase it through her Etsy. It's an easy pattern and works up in a couple hours. It's probably faster if you haven't got a toddler to chase. :D I unfortunately don't have a baby around to model the hoodie, but I DO have a teddy bear. Hopefully he will suffice.
She also graciously answered some of my goofy, newbie blogger questions. These will hopefully be a staple of the Sunday Showcases to come.

How long have you been crocheting?
  • Over 2 years.
How long have you been designing patterns?
  • I probably started designing patters about 1 year ago, after I couldn’t find patterns for what I was “envisioning”!
How did you learn to crochet?
  • My mom suggested crochet after my failed attempt at knitting, since she found it easier. I am a “must see” person, so I took to you tube videos for every stitch and technique.
What is your favorite pattern that you've designed?
What pattern would you recommend to a beginner?
  • I guess just a scarf. It really helps you learn your tension and see how the size can change and you’ll see if you miss an end stitch or turning chain. Just pick a stitch like double crochet and go for as long as you’d like.
Thanks again for letting me test that pattern and for answering my questions. Everyone, go forth and buy some of her patterns! They're super easy to follow.


The second person in the showcase is someone I met through a crocheting thread I frequent on my favorite forums. :D She specializes in amigurumi and I'm glad she does. Her stuff is some of the most professional and cutest I've ever seen. Currently she's only got the pattern for a cat at her Etsy shop, but I'm hoping she'll post the patterns for some of the cute stuff she posts in the thread sometime soon.

She also was very gracious about the question answering. :D

How long have you been crocheting?
  • I began in August of 2009, so I've been crocheting for a little less than a year now. I originally started because I was an illustration student, but had nothing productive to occupy my time with when I wasn't drawing. I had never been good at crafts and I was tired of looking at cool things other people had done and immediately dismissing it like, "Oh, that's awesome, but I'd never be able to do that." I eventually realized that trying to crochet and failing at it was still better than sitting around and doing nothing, so I finally went for it.
How long have you been designing patterns?
  • I made my first pattern about four months ago when I signed up for the SA Secret Admirer exchange. My assignee said that he really liked cats, so that was how my kitty pattern came to be!
How did you learn to crochet?
  • I went out, bought some super saver yarn, picked up a couple of books and holed myself up in my room for a couple of nights. My first attempts at crochet were horrific mutated doilies: I kept making the same mistakes over and over and ended up with this huge pile of misshapen circles. I didn't know anyone else who crocheted, so when I needed help I watched youtube tutorials and drew little diagrams for myself. Youtube was my lifesaver. It took me about two weeks to finally get the hang of the basics.
What is your favorite project you've designed?
What pattern would you recommend to a beginner?
  • In terms of amigurumi, I would recommend any of the patterns from Ana Paula Rimoli's "Amigurumi World" book. They're basic enough for beginners and her instructions are very clear. The best thing about her and her patterns is that she has her own etsy (http://www.etsy.com/shop/anapaulaoli) and encourages people to email her if they have any questions. She's incredibly sweet and I think it's great that a published author takes the time to answer any questions anyone has about the patterns in her book. Knowing that made learning to crochet much less intimidating for me!

Go out and buy the cat pattern from her! Keep your fingers on the refresh button until she posts more patterns to buy, and then GO BUY THOSE! :D

More pattern posts to come. If you buy a pattern from these two, send me a picture at armyofowls@gmail.com of the finished product and I'll post them on the blog.

Saturday, May 29, 2010

Saturday Stitch in pictures! (Magic Ring and Invisible Decrease)

I'm going to attempt an explanation of the magic ring technique and the invisible decrease. Both are things I learned recently, and both have permanently replaced the usual methods I'd use to start amigurumi and decrease things before.

As always, video does a much better job at explaining this than I will. This is the magic ring video I like. This is the invisible decrease video I like. Youtube is one of the best resources for beginners. I've learned so much from how to videos on there.

I digress. I've made the first animal amigurumi pattern I've posted here larger than life. It's a play off of an octopus pattern on Lion Brand's website. Their pattern calls for a g hook and worsted weight yarn. I've bumped it up to an L hook and I held two strands of yarn together as I went. He ended up huge, and he's going to one of my all-time favorite people once he's 100% finished.

Giant Octopus Amigurumi

Materials:
L hook
worsted weight yarn
stitch marker
needle
small amount of black yarn


When starting a magic ring, keep the end of the yarn pointed at your palm. Wrap the yarn around your fingers, and cross the yarn over the end. Don't knot it.


I hold it at the point where the yarn crosses to steady it.


insert hook and pull up a loop.


ch 1. This will anchor the slipknot. Make sure it's not too tight and that you can still pull the circle closed or open.


sc around the tail of the yarn and the circle. Be careful not to let the end of the tail get covered by your sc. This particular pattern calls for 6sc.


Pull the tail of the yarn to make a circle. You can either cut the tail now, or just work it into your project by crocheting over it. You can also weave it in however you like to weave tails in. Now we're on to the octopus pattern. Even if you don't have sound available, watching the videos I linked at the top will help if you run into any snags.


Rnd 2: 2 sc in each sc. (12) *Mark first st of each round. Move marker up as you work.


Rnd 3: 2sc in next st, sc in following st. Repeat around. (18)


Rnd 4: 2sc in first st. sc in each of next 2 st, repeat around. (24)


Rnd 5: 2 sc, sc in next 3, repeat around. (30)


Rnd 6: 2sc, sc in next 4 st. repeat around. (36)


Rnd 7: 2sc, sc in next 5 st. Repeat around. (42)


Rnd 8-17: sc around. (42)


Invisible Decrease: insert hook into *front loop* of next st, then into the front loop of the following st. yarn over and pull through first two loops. Yarn over and pull through remaining two loops. Work Rnds 18-20 in this fashion: Inv. Dec, sc in next 5 (4 then 3 for rnd 19 then 20).


It should be starting to look like a head at this point. Find a spot and either embroider a face (what the black yarn is for) or use whatever size safety eyes you'd like. Stuff the head, but leave some room to continue closing up the head. Work Rnds 21-23 the same way, with an Inv Dec and a decreasing amount of stitches between Inv Dec. Rnd 23 should be an entire rnd of Inv. Dec.
*Stuff head to satisfaction before sewing hole closed*


I made an angry Octopus.


Start the legs the same way you started the head. (6sc in magic ring)


Rnd 2: 2sc in each st around. (12)


Rnd 3-10: sc in each st around. (12)


Lightly stuff and sew closed.


Sew to head. Repeat 7 more times. :D

Hopefully these pictures helped. As always, send pics of finished projects to me at armyofowls@gmail.com.

Wednesday, May 26, 2010

Pattern in Pictures: Alternate change purse

Materials:
less than 3oz of worsted weight yarn
h hook


Ch 4.


9 dc in 4th ch from hook. (first 3 chs count as 1 dc.)


Sl st to top of beginning ch 3. 10 dc total


Ch 3.


dc in same stitch. (counts as 2 dc.)


2 dc in each st around. 20 dc total.


Ch, 3. Working in back loops only, dc in each dc around. (20 dc)


This should make it start to turn into a bowl.


Ch 3 and dc in each dc around. Sl st to top of beginning ch 3 until the bag is as big as you'd like. When you've made it as big as you'd like, ch 4. (this counts as first dc, ch1)


sk next dc. dc in next st. ch1. Repeat around.


sl st to 3rd ch of beginning ch 4.


ch 1, work lazy shell (sc, ch 3, dc) in first st. sk next st. Work lazy shell in next st. sl st to beginning ch 1.


Make the same braid you made for the first bag. Weave it through and you've got yourself a drawstring bag. If you want a bigger bag, just make the bottom bigger. (next row would be 1 dc, 2dc in same st, repeat. following row would be dc 2 times, 2dc in same st and so on and so forth until bottom is wide enough)

The first person to email me a picture of something they've made from one of my patterns gets this bag. :D Send pictures to armyofowls@gmail.com

Saturday, May 22, 2010

FF a day late.

This week just really got away from me. I cannot believe how late in May it already is. I've been filling my days with lots and lots of crochet.

This Fanatic Friday (on a Saturday) is devoted to books full of crochet stitches. As I get further along in my crochet I'm finding it easier and easier to not only adapt crochet patterns to what I need them for, but to write my own patterns as well. Having books full of crochet stitches around has been more than helpful in both endeavors.

The first one I'd like to showcase is The Complete Book of Crochet Stitch Designs by Linda P. Schapper. It contains 500 classic and original patterns. There have been a few places where I've noticed the wording is weird, or they've used the wrong term. It's easy enough to figure it out if you've got a little crochet experience. Plus, the variety of beautiful, interesting patterns makes up for it and then some. I've already made a few shrugs out of the patterns.

Leisure Arts has a lot of good resources in this aspect. I currently own #75071, #75009, and #75033. These have 30, 19, and 19 crochet stitch patterns respectively. The latter 2 have extra patterns using the stitches too. Some of the patterns look a little dated, but there are some baby blankets, rugs, scarves, and dishcloths that are decent. The best thing about these? They're all $3.50! They're also available in most craft stores. I got mine at JoAnn's, but I've seen them in Hobby Lobby and Wal-mart. Definitely worth a look, if not a purchase.


The stitch I used for this pattern is located in Leisure Arts #75033. It's called "Shells & Lace". I've adapted it to make a shrug. The one in this pattern is for a little girl, probably sized around 2T. It's so easy to turn it into a grown person's sized shrug. The instructions to make a bigger shrug will follow the pattern.


Girl's Shrug

Materials:
-around 3 oz of worsted weight yarn
-H hook
-Yarn needle
-measuring tape
-2 stitch markers

Abbreviations used:
sc= single crochet
sk= skip
ch= chain
dc= double crochet

Pattern note: This pattern is essentially just a rectangle. I tend to crochet very tightly, so with the listed materials I made a size 2T shrug. It's a rectangle about 8in wide and approximately 16in long. Also, the pattern will tell you to work a st in the next dc and sometimes that will mean into the third ch of the beginning ch 5 or ch 6.

-Shell stitch is 5 dc in stitch indicated.-

Ch 44

Row 1: (right side) sc in second ch from hook. *sk next 2 chs, work Shell in next ch, sk next 2 chs, sc in next ch. Repeat from * across.

Row 2: Ch 5 (counts as first dc plus ch 2), turn. sc in center dc of next shell, ch 2, dc in next sc. *ch 2, sc in center dc of next shell, ch 2, dc in next sc. Repeat from * across.

Row 3: Ch 6 (counts as first dc plus ch 3) turn. sc in next sc, ch 3, dc in next dc, *ch 3, sc in next sc, ch 3, dc in next dc. Repeat from * across.

Row 4: ch 1, turn, sc in first dc, *ch 2, dc in next sc, ch 2, sc in next dc. Repeat from * across.

Row 5: Ch 1, turn, sc in first sc, *work shell in next dc, sc in next sc. Repeat from * across.

Repeat Rows 2-5 until piece is at least 16 inches long. You should end on Row 4. Don't fasten off. Fold the rectangle in half, length-wise. About 3 inches from your hook, use a stitch marker to hold the sides of the rectangle together. About 10 inches from your stitch marker, place another stitch marker holding the 2 sides together. Now pick up your hook again.

Edging:
Working in the edges of the rows, sc the sides together until you reach the stitch marker. Remove the stitch marker and continue working sc in the edges of just the side closest to you. Once you reach the second stitch marker, remove it and start single crocheting both sides together again. Once you reach the end, fasten off, and you've got yourself a shrug.


Adult sizes:
You just have to make a rectangle wide enough to go around your arm at it's widest point, and across your back. Add length to the rectangle if you want longer sleeves. (Obviously this will take more yarn too.)


Using this rectangle, there are so many options of stitches that open up. Using these books you should be able to make a wide variety of shrugs, rugs, blankets, and scarves. If you're really crafty you can adapt these to hats as well. These patterns aren't only for use in a rectangular or square application. All it takes is some math and some knowledge of decreases and increases and things start getting circular or 3-D.

Does this cover the Saturday stitch portion too? :D

Sunday, May 9, 2010

Sunday Showcase!

This is a new portion of the blog where I tell everyone about another awesome crochet blog or website. I've come across many while searching for patterns for things. I'll have more than enough to fill this area for awhile.

This week's entry belongs entirely to Ravelry. You have to sign up for it but it's free. It would be worth it to pay to join. This site is a collection of knit and crochet patterns. Some you have to pay for but most of them are free. I've got 3 patterns posted on there so far.

BUT WAIT THERE'S MORE! They have so many search options. Let's say all that you've got with you is 500 yards of worsted weight yarn. You can search by yarn yardage, weight, hook size, etc. This option is invaluable to those trying to use up a yarn stash. That's not where the search options end. You can narrow your search enough that you can find all the free baby sweater patterns using sport weight yarn and an E hook.

As far as my favorite thing regarding just the patterns goes, I LOVE the variety of stuff on this site. There's even a naughty section, for those of you with a Mom like mine who has a decidedly perverse sense of humor and would appreciate a crocheted amigurumi dildo. I'm not even kidding.

So to all of you following, and all those learning to crochet along with me, join. It's only a few moments of your time. When you do join, search for FistfulOfRobots. That's me and I will gladly be your Ravelry.com friend. :D


I'd also like to showcase my Mom, for being awesome and giving me a perverse (read: Awesome!) sense of humor. She taught me to crochet and I love her the mostest.

Saturday, May 8, 2010

It's much bigger on the inside.


An order came in for a TARDIS and I was so excited. The trial and error process was a little more than I expected, but I'm alright with how it turned out. It's so easy to make. As always, email me pictures of finished products or if you've got any questions. (armyofowls@gmail.com)


Materials:
3-5 oz. worsted weight yarn in blue
white and black yarn for embroidering
g hook
yarn needle
stuffing

Pattern Note: I crochet tightly anyways, but I find that crocheting tightly helps a lot in this aspect because it makes the rectangles a little bit more sturdy.

Side: (Make 4)
Ch 16
Row 1: sc in second ch from hook and in each stitch across.(15 sc)
Row 2-25: ch 1, turn. sc in each sc. (15 sc)
Fasten off.

[if you want a taller TARDIS make more rows here]

Bottom:
Ch 21
Row 1: sc in second ch from hook and in each sc across (20 sc)
Row 2-20: ch 1, turn. sc in each sc. (20 sc)
Fasten off.

[make as many rows as needed to make a square.]

Top:
ch 16
Row 1: sc in second ch from hook and in each sc across (15 sc)
Row 2-15: ch 1, turn. sc in each sc. (15 sc)
Fasten off

Assembly:
1: With white yarn, embroider "Police Box" on the top of each of the sides. Under that, embroider 6 "windows" in 2 groups of 3. Directly under that, embroider 2 sets of 3 windows again.

2. On one of the sides (I picked the best looking one because I'm not the best embroiderer) stitch lines around the windows to make doors. (using black yarn) See photo.

3. Sew all four sides together to make a 3-d rectangle.

4. Sew bottom to 3-D rectangle. It should be bigger than the rectangle by about 2 stitches on each side.

5. To make the light on top, ch 5, sl st in second ch from hook and in each across. Sew this, upright, to the top.

*If desired, cut cardboard to fit inside the bottom and all four sides. You don't need to attach these in any way. They'll be held down and up by the stuffing.*

6. Sew top to top of rectangle 3/4 of the way. Stuff TARDIS. Sew last side of top. If you pull a little bit on the light in the middle of the top it gives it a peaked appearance.

7. Find a handsome Scottish gentleman and go gallivanting across space and time.

Friday, May 7, 2010

Super Super Fanatic Fridays

Super Super Cute Crochet by Brigitte Read is an amazing book. She does amazing work with yarn and makes some of the most realistic looking animals I've ever seen. I can't rave enough about her. What I will do, is tell you how this is a run of the mill (pattern-wise) book full of the least run-of-the-mill animals I've ever seen made into amigurumi. Here's what she's got in there:

  • Pomeranian
  • Bunny
  • Kitten
  • Pig
  • Siberian Hamster
  • Puppy
  • Cat
  • Cow (It's square! And ridiculously cute!)
  • Polar Bear
  • Penguin (oh my the cuteness of this penguin. my god...)
  • Turtles
  • Crocodile
  • Frogs and Toads
  • Walrus
  • Manta Ray
  • Squid (this one I'm in the middle of and will post pictures of when it's finished)
  • Whale
  • Shrimp
  • Duck-billed platypus (!!!)
  • Snail
  • Flamingo
  • Tortoise
  • Hippo
  • Guinea Pig
  • Anteater
  • Butterfly
  • Bluebird
  • Toucan
  • Owls
  • Panda
  • Koala
  • Silkworm
  • Arctic Fox
  • Star-nosed mole
  • Dragon
They all look so complex but the patterns are pretty easy to follow as long as you know your crochet basics (and after last Fanatic Friday, you should. BUY THAT BOOK!)

There is a TARDIS in the works, folks, and I'm working on writing out the Old Gregg pattern. Get ready for some more patterns, as well as the very first Sunday Showcase.