Saturday, November 26, 2011

Salazar Snake


I think that snakes are my favorite things to make using variegated yarns. The stripes work up so nicely. This particular yarn is Vanna's Choice Charcoal Print. Any variegated yarn should work fine. Plus, since it's a toy plain ol' cheap Red Heart would work perfectly. I just wrote this pattern down as I went, so sometimes the stitches may seem off. Just work them like the pattern says and you should get a snake with a more realistically shaped head. If you guys have any suggestions or run into any problems, feel free to email me at armyofowls@gmail.com

Edit 8/14/2012: I've added some alternate directions for the tail. I find it makes the tail a little bit more life-like.
Materials:
  • any yarn you'd like, just make sure you change the hook size so that your gauge is tight and none of the stuffing is falling out. This takes anywhere from 1 oz of yarn to several skeins, depending on how long you want the snake to be. I usually try to use an entire skein of this particular yarn. It's 3.5 oz.
  • f hook
  • yarn needle
  • safety eyes, or a contrasting color yarn to embroider eyes on your snake.

Abbreviations:
  • sc = single crochet
  • ch = chain
  • dec = decrease
  • st = stitch


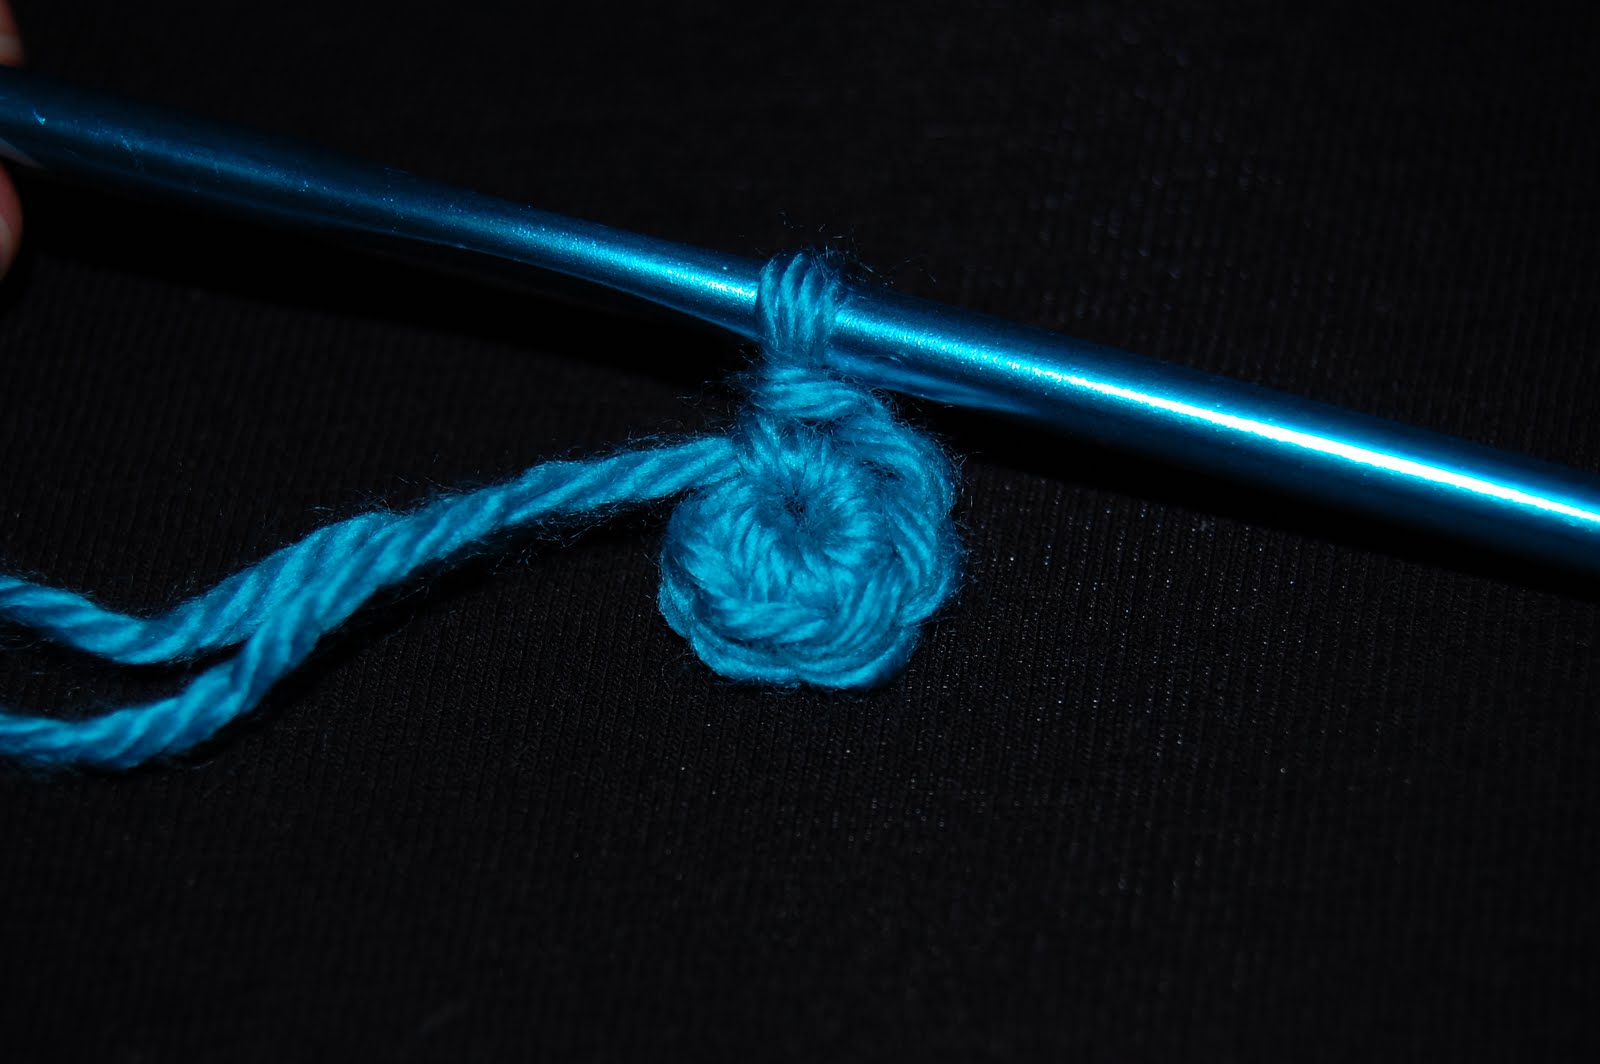
-Ch 5. sc in second chain from hook and in next 2 chs. Work 3 sc in end ch. Working in opposite side of ch, sc in next two bumps. Work 2 sc in last bump. 10 sts total.

Work continues in a spiral, so remember to mark your first stitch somehow.

-Round 2: Sc in next 4 sts. 3 sc in next st. Repeat around.
-Round 3-5: Sc around
-Round 6: 2 sc in next st. Sc in next 4 sts. 2 sc in next st. Sc in next st. 2 sc in next st. Sc in next 4 sts. 2 sc in next st. Sc in next st.

-Round 7 & 8: Sc around for 2 rounds.

-Round 9: Sc. 2 sc in next st. Sc in next 5. 2sc. Sc in next 2. 2 sc. Sc in next 5. 2 sc. Sc.

-Round 10-12: Sc around

-Round 13: Work a decrease every 2 sc. It doesn't work out exactly just make sure you end up with a multiple of 3 stitches at the end. I believe I worked sc, [dec, sc in next 2 st.] Repeat []around to last 5 sts. Dec, sc,dec.

-Round 14: [Sc, dec] around to last stitch. Sc in last stitch. Stuff head and put eyes on.

-Round 15: Dec, sc in remaining sts. This should leave you with ten stitches.

Sc around, stuffing as you go, until the snake is desired length.

Sc 3, dec. Repeat. (8sts)

Sc around for five rounds.

Sc 2,dec. Repeat. (6 sts)

Sc around 5 rounds.

Sc, dec around. (4)
Sc around for 3 rounds.
Dec twice.

Cut yarn, leaving enough to sew tail closed.

Alternate tail: If you want a more streamlined tail, Just decrease one at the beginning of the round. I started using markers again at this point. I decreased, then worked a few rounds. Let's say 10. Then I decreased at the beginning again, worked 10 rounds.  Then I only worked 5 rounds between decrease rounds, etc., until I only had a few stitches left.

Be sure to email me at armyofowls@gmail.com if you've got any questions or if you'd like to share some of the snakes you've made. Please feel free to make these as gifts, and share the pattern. Just be sure to credit me or link to my blog. Thank you! Please do not sell the pattern.

Saturday, April 2, 2011

Kay hat (for a few causes)

A while back a friend asked if anyone could make hats for her mom, who was beginning chemotherapy. I found some great patterns on ravelry, but got a sudden rush of inspiration to make a more lightweight, but still ornate-looking chemo cap. The Kay hat was born. (it's named after the woman I created it for)

Kay Hat:

Materials:
-
about 3-4 oz of worsted weight yarn
-K and J hook. (BE WARNED: I crochet very, very tightly. You made need a smaller hook, as long as they're one size apart, they'll work fine.)
-yarn needle (for sewing in ends)

abbreviations:
sc- single crochet
dc- double crochet


Round 1: make a magic ring. Ch 2 (this doesn't count as a dc) Make 10 dc in the ring. Pull closed. (Alternately, you can ch 3, slip stitch to make a ring, and then ch 2 and work 10 dc) slip stitch to first dc. (10 stitches total)


Rnd 2: ch 2, work 2 dc (hereafter referred to as increase) in same st. Increase in each stitch around. slip stitch to first dc. (20 total)


Rnd 3: ch 2, dc in same stitch. Increase in next stitch. (dc, inc) around. Slip stitch to beginning dc. (30 total)

Here's where we begin the crossed stitches. I hope I can explain it well.


Rnd 4: ch 2. dc in next stitch.


dc in the stitch behind the stitch you just worked.


Voila! Crossed double crochet! Now increase in the next stitch. work Crossed dc over next 2 stitches. (Skip one stitch, then dc in following stitch. Then dc in the stitch you skipped)
work increases and crossed dc around. slip stitch to beginning dc.


Rnd 5: ch 2, skip 2 stitches. dc in next stitch.


dc in stitch behind the dc you just made (crossed dc)


dc in first stitch you skipped. (it will also be the stitch you slip stitched into to close the previous round) crossed dc across 3 stitches made!


When working increases, make sure you do them in the following stitch. The crossed dc can make things confusing. My thumbnail is on the stitch you're supposed to work the increase in.


increase, then work a crossed dc across next three stitches. (skip 2 stitches, dc, then dc in second skipped stitch, then dc in first skipped stitch.


Rnd 6: ch 2, work crossed dc (ending up in the same stitch as the ch 2), work another crossed dc. increase. Work 2 crossed dc, then increase around. slip stitch to beginning dc.


Now begins the rounds of working in strictly crossed dc. They should each take up 2 stitches. always slip stitch to the first dc to close each round. I make 5-6 rounds here, but you can make more if you want a longer hat.


Once the hat is long enough, switch to the J hook.


ch 1, sc around. slip stitch to ch 1. I usually do 2 rows of sc, but you can do more if you'd like.


Now I'd like to show you all my new favorite way to finish things. Reverse sc (crab stitch)!


When you've made enough rows of sc, ch 1. Now go into the stitch to the right of the ch you just made. work as you would a regular sc. There you go. You've made a crab stitch!


Continue around. slip stitch to beginning ch 1.


I also like to slip stitch into the back of the work (the inside of the hat) just under where the round ends. Fasten off.


You're done! Feel free to add any embellishments you like. I've sewn some crocheted flowers to hair clips, and they go very nicely on the edge of the hat. Plus, they're temporary if you don't want them some of the time. They're also a handy little clip for your hair that's always on your hat if you need it. The butterfly in the second picture is sewn onto a pin.

As always, send photos of finished products to armyofowls@gmail.com. Feel free to sell the finished products of this, but please link the customers to the pattern here. Please don't sell the pattern. Thanks!


There's a reason this post is overcome with blue. Today autism speaks has asked everyone to Light It Up Blue. It's all to raise awareness about autism. I'm lucky enough to know not only people working daily with kids on the ASD spectrum, I know some kids on it as well. My son is having his own issues with development and speech, so I sympathize with wanting your child to excel and grow past their shortcomings, but wouldn't change a thing about them. I once heard someone say that the fear of autism is much worse than the actuality of it. I wholeheartedly believe this. PLEASE, take the time to learn the possible warning signs of autism. Early Intervention makes all the difference, and you could notice something a parent may not.

Friday, April 1, 2011

Changing colors in crochet.

I have a few more pattern in pictures lined up for you folks, so hold steady. This post could probably do better as a saturday stitch entry, but the question came up today. I figured I'd make a tutorial since I didn't see any online anywhere.

This is more for a blanket, scarf, or hat that is composed of more than 2 stripe colors. If you're only using 2 colors, use this method.

I'm making a blanket holding two strands of yarn together. Hopefully the pictures make everything clear enough.


Work the last stitch of the row up until the last step of the stitch. (single crochet in this instance). Cut your yarn, leaving a decent sized tail.


Bring in the new yarn color. Holding both colors together, finish the stitch of the last row. Be sure to leave a decent sized tail on the new yarn you're joining in.


This keeps the edges looking a little neater.

At this point, I drape the tail of the old color and new color over the yarn I'm working with. Since I did this with single crochet, I chained 1. By draping the tails over and chaining around them it helps to anchor the yarn so it won't come unraveled when you wash and dry it.


After you've chained the appropriate amount, turn. Place the tails of the previous and current yarn colors on top of the next stitch. Insert hook and complete stitch as normal. Continue positioning the yarn tails over the stitches you're working into, and sc (or whatever stitch you're using) around them.


Holding all the yarn tails takes some practice but it's worth it. You definitely (at least in this case) could just tie a knot with the tails of the two colors. Just make sure you're always finishing the last stitch of the previous color with the new color.

Hope that makes sense! Have fun making stripey stuff. :)

Friday, March 18, 2011

It's been a while.

I have plenty of patterns to share with you all. I'm also in the middle of setting up an etsy shop. I've started to knit as well. Sometimes it seems like there's this divide between yarn crafters, knitters get all high and mighty about their craft using the yarn more efficiently or whatever. They've both got their strengths. Knitting seems to make clothing better, it's much easier to get a decent drape to your work. Crochet is amazing for building 3-d things, or for making tough, sturdy fabrics (like in a purse). At any rate, I now love them both equally. There are certain things I know I will always knit from now on, and certain knitted things that I will crochet.

But hey, you guys can get free stuff from my knitting obsession! Just email submissions for a name for my knitting blog. Just be sure to google what you suggest so we can all be sure we don't steal someone else's ideas. First pick gets $50 worth of my crocheted stuff, second gets $25, and third gets $15. There have been some amazing submissions so far. I plan on making a decision tonight, so think quick and send on an email. Good Luck!

Saturday, January 1, 2011

Woof.


Materials:
>100g of worsted weight yarn
L Hook (8mm)
tapestry needle

Stitches used:
dc-double crochet
dc inc- double crochet increase (2 dc in same st)
sc-single crochet
sc inc-single crochet increase (2 sc in same st)
sc dec-single crochet decrease (insert hook in st, yarn over and pull up a loop, insert hook into following st, yarn over and pull up a loop. Yarn over and pull through all 3 loops on hook)

Hat:
Rnd 1: Make a magic ring. Ch3, work 9 dc in magic ring. join with a sl st to top of ch 3.(10 total. ch3 counts as dc)
-alternately, ch4 and work 9 dc in 4th ch from hook-
Rnd 2: ch 3, dc in same st as join. work dc inc in each dc around. join to ch 3. (20 total)
Rnd 3: ch 3, dc inc in next st. [dc, dc inc in next st] around. join to ch 3. (30 total)
Rnd 4: ch 3, dc in next st. dc inc in next st. [dc in next 2 st, dc inc in following st] around. join to ch 3. (40 total)
Rnd 5: ch 3, dc in next 2 sts. dc inc in next st. [dc in next 3 st, dc inc in following st] around. join to ch 3. (50 total)
Rnd 6-11: ch 3, dc in each st around. (50 total)
Fasten off.

Ear (make 2):
Ch 7.
Row 1: sc in second ch from hook and in each ch across. (6 sc)
Row 2-7: Ch 1, turn, sc across. (6 sc)
Row 8: sc inc in first st. sc across to last st. sc inc in last st. (8 sc)
Row 9-14: sc in each st. (8 sc)
Row 10: sc dec, sc in each st across until last 2 st. sc dec. (6 sc)
Row 11: sc dec, sc in each st across until last 2 st. sc dec. (4 sc)
Row 12: sc dec twice. (2 sc)
Row 13: sc dec. (1 sc)
Fasten off.

Using yarn needle sew ears to hat as in photo. Enjoy! As always send any corrections, questions, or finished products you've made from the pattern to me at armyofowls@gmail.com

Thursday, November 18, 2010

Pattern in Pictures: Jellyfish!


Jellyfish amigurumi

This little guy is so easy to make. It takes barely any yarn and time to whip them up. I've made them with 5 tentacles but it's easy to add as many as you'd like. The length of the tentacles is also easy to change. Have fun and make sure to send me pictures of any you make at armyofowls@gmail.com

Materials:
  • less than 100 yds of yarn. Any weight or color would work fine.
  • H hook
  • yarn needle
Top:
Rnd 1: make a magic ring. work 6 sc in ring. (alternately, chain 2, work 6 sc in second ch from hook)

Rnd 2: 2sc in each sc around. (12 total)

Rnd 3: sc in first st. 2 sc in next st. repeat around. (18 sc total)

Rnd 4: sc in first 2 st. 2 sc in next st. repeat around. (24)

Rnd 5-9: sc around. (24 total)


Rnd 10: sl st in 1st st. ch 1, sk next stitch. 4 sc in next st. ch 1, sk next st. repeat around. Fasten off.


Tentacles:
ch 25. leave a long tail for sewing. (Make 5)

Assembly:
Turn jellyfish top inside out. Sew the tentacles as shown in the photo.


After all tentacles are sewn on turn jellyfish top right side out. You're done!